


To get an incredible night’s rest, then, at that point, it’s most likely a chance to update your sleeping pad. For the majority of us, we’re dozing on something very awkward, leaving us with throbs, agonies, and fretfulness during the evening.
Adaptable padding beddings are amazing for some individuals, because of their supporting material that helps usher you into merry Neverland. Notwithstanding, on the grounds that the actual froth isn’t quite as unbending as an innerspring bed, you really want additional help. That is where a bedding establishment comes in.
Could it be said that you are a piece shrewd? Do you like Do-It-Yourself projects? Then, at that point, you should make your own one and you should need to know how to build a memory foam mattress foundation!
Today, we will take a gander at how you can construct your own sleeping cushion starting point for adaptable padding bedding. Whether you’re overhauling your bed or you maintain that a superior way should rest on your ongoing one, this establishment can assist you with capitalizing on your adaptive padding.
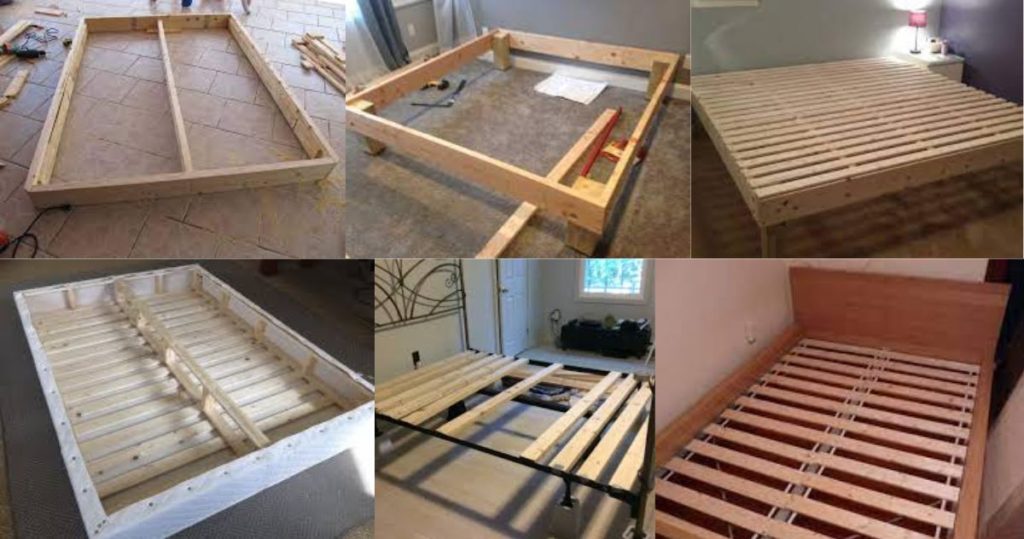
How to build a memory foam mattress foundation easy 4 steps
Stage 1 – Get Your Wood
Before you can begin building anything, you want to ensure that you have all of the wood essential for the gig. To do this, you’ll need to quantify the length and width of your adaptable padding bedding. You can set up your establishment in two or three distinct ways.
To start with, you can have the sleeping pad flush against the edges of the casing. This will make it simpler to make the bed, however, the sleeping cushion could slide off.
Second, you can make a line around the bedding so it sits in support. This will keep it stable, however, it can make it harder to put sheets and bedding covers on it.
Regardless, you will need to quantify the general edge, as well as crossbars for help. Contingent upon the width of the bed, you’ll require somewhere around a few cross bars to guarantee that you don’t encounter hanging or breaking.
Remember that the length of the external edge will be somewhat longer than the center cross bars. Continuously make certain to gauge your wood on different occasions before you get them cut. This will assist with keeping you from being required to purchase all the more later.
The other wood you’ll require is the braces that go over the edge, as well as the feet. More braces will offer better unbending nature, and taller feet will permit you to store things under the bed. In this way, plan your development as needs are.
Stage 2 – Make The Casing
While building your sleeping cushion establishment, you’ll be certain that you have sufficient room. We suggest making it either in the room where it will remain (on the off chance that you can) or in an assigned work area.
To make the casing, connect the two side parts of the end pieces. Use the wood paste to keep them intact so you can pound nails in without the wood moving. Verify what amount of time it requires for the wood to dry so you can design as needs be.
In the event that you’re constructing support for the sleeping cushion, the best thing to do is to add wooden boards to beyond the base edge. This will make it simpler to develop. All things considered, stick the boards onto the edge whenever it’s finished and append screws on the corners for support.
These ought to be longwise since your braces will go across the width of the bed. Once more, use the wood paste to set them set up.
After the paste has dried, you can either utilize screws (suggested) or nails. On the off chance that you use screws, you’ll need to penetrate an opening first so you can work quicker. Nails are great, yet they can take out over the long run.
Stage 3 – Add The Supports
At the point when your casing has been in a bad way or nailed into place, presently you can add the supports. The best thing to do will be to append them to each side, as well as the crossbars in the center. Along these lines, the braces will be more steady. Once more, more braces will offer extra help, so be certain that you have to the point of forestalling listing. If you have any desire to make greater soundness, you can stick them set up prior to screwing (or nailing) as you did with the casing.
Stage 4 – Add The Legs
In the event that you have support, you’ll have to turn the casing over to add the legs. In the event that it’s flush, you can connect the legs and afterward turn the casing over once they’re in. The most ideal way to associate casing legs is to place the wood on the corner where the different sides meet. Generally, sticking them into the spot and afterward nailing them into the frame is ideal.
Be mindful so as not to raise a ruckus around town or screws that are now in the wood. You might have to do an additional intention to guarantee that your legs can be secured accurately. follow our guide best bed frame for heavy person it’s helpful for you.
Something else to remember is that you might need to append legs to the center of the casing also. Contingent upon the size of your bed, basically having them in the corners can put pointless pressure and possibly make them bow out. Having legs on the sides will make greater strength.
Read also: ifvodmedia